Serve
Serve machine-learning models
In the previous section we have introduced the command run of Flama CLI. The run command allowed us to serve any Flama app, being possible to adapt the configuration of the app using the standard uvicorn arguments. But this is not the end of the story.
The command serve comes to the rescue of those who are looking for an instantaneous serving of an ML model without having to write an app. This command, as we are about to see, only requires the ML model to be served. The model will have to be saved as a binary file beforehand by using the tools offered by Flama. The details about how to properly save the models can be found in the section packaging models.
Example files
The best way of seeing the power of serve is by example. Although we have not yet seen how to produce the ML file needed (go to packaging models to learn how), we can use any of the following example files for the sake of learning:
Once you have downloaded any of the files listed above, you will be able to serve your first ML model codeless.
Codeless serving
Let's pick up one of the example model files we have just introduced in the previous section, say sklearn_model.flm. Now, let's run:
> flama serve sklearn_model.flm
INFO:     Started server process [15822]INFO:     Waiting for application startup.INFO:     Application startup complete.INFO:     Uvicorn running on http://127.0.0.1:8000 (Press CTRL+C to quit)
Does it seem familiar? Yup, indeed, as you can see we have a Flama app up and running on http://127.0.0.1 and listening via the port 8000. But, this time we have not written a single line of code! This is the codeless approach of Flama to ML models deployment, which makes possible the deployment of an already trained-tested ML model as an API ready to receive requests and return estimations almost without any effort.
How do we interact with the model?
So, we have an app which is running an ML model. The natural question to ask now is, how do we interact with that model? All models served with flama serve come with the following endpoints for free:
- GET http://127.0.0.1:8000/docs/: Returns an interactive HTML documentation which allows us to interact with the model in our web browser. This is the recommended way to start interacting with the model, as it informs us about all the routes available, and helps us to figure how to programmatically interact with all other routes.
- GET http://127.0.0.1:8000/schema/: Returns a JSON which represents the model being served.
- POST http://127.0.0.1:8000/predict/ Expects the input data (observations) to be passed as argument to predict their output.
Interactive and intuitive documentation
As mentioned in the previous section, we recommend inspecting the documentation route (/docs/) as soon as we have the
model serving. To do that you only need to flama serve whatever model which you have packaged previously, and you'll
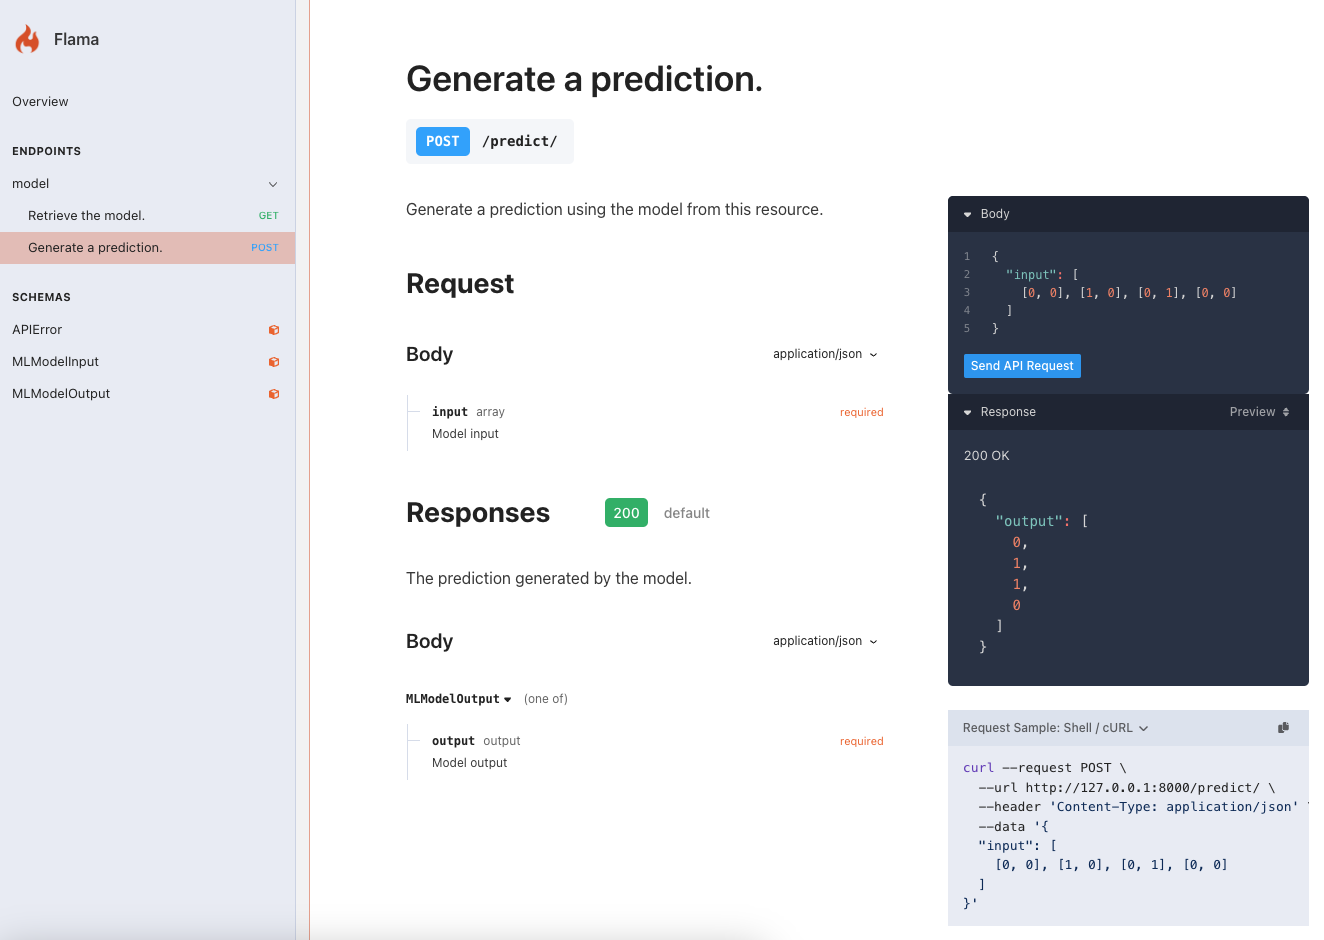
get something like:

As you can see, the documentation page not only gives you a handy way to interact with the different endpoints
available, but also gives you the equivalent curl statement. For instance, in order to get the schema of the model:
> curl --request GET \ --url http://127.0.0.1:8000/ \ --header 'Content-Type: application/json'
{ "id": "621c1d8a-144a-4a86-9a9c-9157f80bfa2d", "timestamp": "2023-03-10T11:30:00", "framework": { "lib": "sklearn", "version": "1.2.2" }, "model": { "obj": "MLPClassifier", "info": { "activation": "tanh", "alpha": 0.0001, "batch_size": "auto", "beta_1": 0.9, "beta_2": 0.999, "early_stopping": false, "epsilon": 1e-8, "hidden_layer_sizes": [ 10 ], "learning_rate": "constant", "learning_rate_init": 0.001, "max_fun": 15000, "max_iter": 2000, "momentum": 0.9, "n_iter_no_change": 10, "nesterovs_momentum": true, "power_t": 0.5, "random_state": null, "shuffle": true, "solver": "adam", "tol": 0.0001, "validation_fraction": 0.1, "verbose": false, "warm_start": false }, "params": { "optimizer": "adams" }, "metrics": { "recall": "0.95" } }, "extra": { "model_version": "1.0.0", "model_description": "This is a test model", "model_author": "John Doe", "model_license": "MIT", "tags": [ "test", "example" ] }}Or, in case we want to make a prediction:

> curl --request POST \ --url http://127.0.0.1:8000/predict/ \ --header 'Content-Type: application/json' \ --data '{ "input": [ [0, 0], [1, 0], [0, 1], [0, 0] ]}'
{ "output": [ 0, 1, 1, 0 ]}🥳 Awesome! Now, not only you have your model serving, but you also made predictions by interacting with it programmatically. The cool thing about this, is that this way of interacting with your model via requests is the same, no matter where the model is deployed. And, this is a huge step towards the productionalization of your model. Now, we have a reproducible problem, which is key to understand and replicate the behaviour of our models in a production environment, since it'll be the same as we observe in local.
Parameters
Although the default usage of flama serve is already very convenient, you might be interested in customise a bit the result. For instance, you might want to serve the model at a different route (i.e., not at the default /), or the name of the model (i.e., not model), and so on. Such a customisation is possible thanks to the different optional inputs of the CLI:
> flama serve --help
Usage: flama serve [OPTIONS] MODEL_PATH
  Serve an ML model file within a Flama Application.
  Serve the ML model file specified by <MODEL_PATH> within a Flama  Application.
Options:  --model-url TEXT                Route of the model  [default: /]  --model-name TEXT               Name of the model  [default: model]  --app-debug BOOLEAN             Debug mode  [default: False]  --app-title TEXT                Name of the application  [default: Flama]  --app-version TEXT              Version of the application  [default: 0.1.0]  --app-description TEXT          Description of the application  [default:                                  Fire up with the flame]  --app-schema TEXT               Route of the application schema  [default:                                  /schema/]  --app-docs TEXT                 Route of the application documentation                                  [default: /docs/]  --server-host TEXT              Bind socket to this host.  [default:                                  127.0.0.1]  --server-port INTEGER           Bind socket to this port.  [default: 8000]  --server-reload                 Enable auto-reload.  --server-uds TEXT               Bind to a UNIX domain socket.  --server-fd INTEGER             Bind to socket from this file descriptor.  --server-reload-dirs PATH       Set reload directories explicitly, instead                                  of using the current working directory.  --server-reload-includes TEXT   Set glob patterns to include while watching                                  for files. Includes '*.py' by default; these                                  defaults can be overridden with `--server-                                  reload-exclude`. This option has no effect                                  unless watchfiles is installed.  --server-reload-excludes TEXT   Set glob patterns to exclude while watching                                  for files. Includes '.*, .py[cod], .sw.*,                                  ~*' by default; these defaults can be                                  overridden with `--server-reload-include`.                                  This option has no effect unless watchfiles                                  is installed.  --server-reload-delay FLOAT     Delay between previous and next check if                                  application needs to be. Defaults to 0.25s.                                  [default: 0.25]  --server-workers INTEGER        Number of worker processes. Defaults to the                                  $WEB_CONCURRENCY environment variable if                                  available, or 1. Not valid with --server-                                  dev.  --server-loop [auto|asyncio|uvloop]                                  Event loop implementation.  [default: auto]  --server-http [auto|h11|httptools]                                  HTTP protocol implementation.  [default:                                  auto]  --server-ws [auto|none|websockets|wsproto]                                  WebSocket protocol implementation.                                  [default: auto]  --server-ws-max-size INTEGER    WebSocket max size message in bytes                                  [default: 16777216]  --server-ws-ping-interval FLOAT                                  WebSocket ping interval  [default: 20.0]  --server-ws-ping-timeout FLOAT  WebSocket ping timeout  [default: 20.0]  --server-ws-per-message-deflate BOOLEAN                                  WebSocket per-message-deflate compression                                  [default: True]  --server-lifespan [auto|on|off]                                  Lifespan implementation.  [default: auto]  --server-interface [auto|asgi3|asgi2|wsgi]                                  Select ASGI3, ASGI2, or WSGI as the                                  application interface.  [default: auto]  --server-env-file PATH          Environment configuration file.  --server-log-config PATH        Logging configuration file. Supported                                  formats: .ini, .json, .yaml.  --server-log-level [critical|error|warning|info|debug|trace]                                  Log level. [default: info]  --server-access-log / --server-no-access-log                                  Enable/Disable access log.  --server-use-colors / --server-no-use-colors                                  Enable/Disable colorized logging.  --server-proxy-headers / --server-no-proxy-headers                                  Enable/Disable X-Forwarded-Proto,                                  X-Forwarded-For, X-Forwarded-Port to                                  populate remote address info.  --server-server-header / --server-no-server-header                                  Enable/Disable default Server header.  --server-date-header / --server-no-date-header                                  Enable/Disable default Date header.  --server-forwarded-allow-ips TEXT                                  Comma separated list of IPs to trust with                                  proxy headers. Defaults to the                                  $FORWARDED_ALLOW_IPS environment variable if                                  available, or '127.0.0.1'.  --server-root-path TEXT         Set the ASGI 'root_path' for applications                                  submounted below a given URL path.  --server-limit-concurrency INTEGER                                  Maximum number of concurrent connections or                                  tasks to allow, before issuing HTTP 503                                  responses.  --server-backlog INTEGER        Maximum number of connections to hold in                                  backlog  --server-limit-max-requests INTEGER                                  Maximum number of requests to service before                                  terminating the process.  --server-timeout-keep-alive INTEGER                                  Close Keep-Alive connections if no new data                                  is received within this timeout.  [default:                                  5]  --server-ssl-keyfile TEXT       SSL key file  --server-ssl-certfile TEXT      SSL certificate file  --server-ssl-keyfile-password TEXT                                  SSL keyfile password  --server-ssl-version INTEGER    SSL version to use (see stdlib ssl module's)                                  [default: 17]  --server-ssl-cert-reqs INTEGER  Whether client certificate is required (see                                  stdlib ssl module's)  [default: 0]  --server-ssl-ca-certs TEXT      CA certificates file  --server-ssl-ciphers TEXT       Ciphers to use (see stdlib ssl module's)                                  [default: TLSv1]  --server-headers TEXT           Specify custom default HTTP response headers                                  as a Name:Value pair  --server-app-dir TEXT           Look for APP in the specified directory, by                                  adding this to the PYTHONPATH. Defaults to                                  the current working directory.  [default: .]  --server-h11-max-incomplete-event-size INTEGER                                  For h11, the maximum number of bytes to                                  buffer of an incomplete event.  --server-factory                Treat APP as an application factory, i.e. a                                  () -> <ASGI app> callable.  --help                          Show this message and exit.
We can readily see the following groups of parameters:
Model parameters
- model-url: Route of the model (default: /)
- model-name: Name of the model (default: model)
App parameters
- app-debug: Enable debug mode (default: False)
- app-title: Name of the application (default: Flama)
- app-version: Version of the application (default: 0.1.0)
- app-description: Description of the application (default: Fire up) with the flame]
- app-docs: Description of the application (default: Fire up) with the flame]
- app-schema: Description of the application (default: Fire up) with the flame]
The parameter app-debug brings with it useful tools which make the debugging of the code easier, e.g. highly-detailed error messages, and interactive error webpages.
Server parameters
All uvicorn options can be passed to the command serve with the format
server-<UVICORN_OPTION_NAME>, as we discussed for the command run, e.g.:
- server-host: Bind socket to this host (default: 127.0.0.1)
- server-port: Bind socket to this port (default: 8000)
How to use parameters
Each of the previous parameters can be directly passed to the CLI by using either --<option-name> <value>, or by
utilising the equivalent environment variable. The equivalent environment variable of any option will be named
FLAMA_<OPTION_NAME>=<VALUE> (take care, the equivalent environment variable needs to have the prefix FLAMA, and
written in capital letters, and underscored). For instance, if we want to change the route where the model is served we
can do it by any of the following two equivalent ways:
Using option argument
> flama serve sklearn_model.flm --model-url=/xorUsing environment variable
> export FLAMA_MODEL_PATH=sklearn_model.flm> export FLAMA_MODEL_URL=/xor> flama serve sklearn_model.flmExample
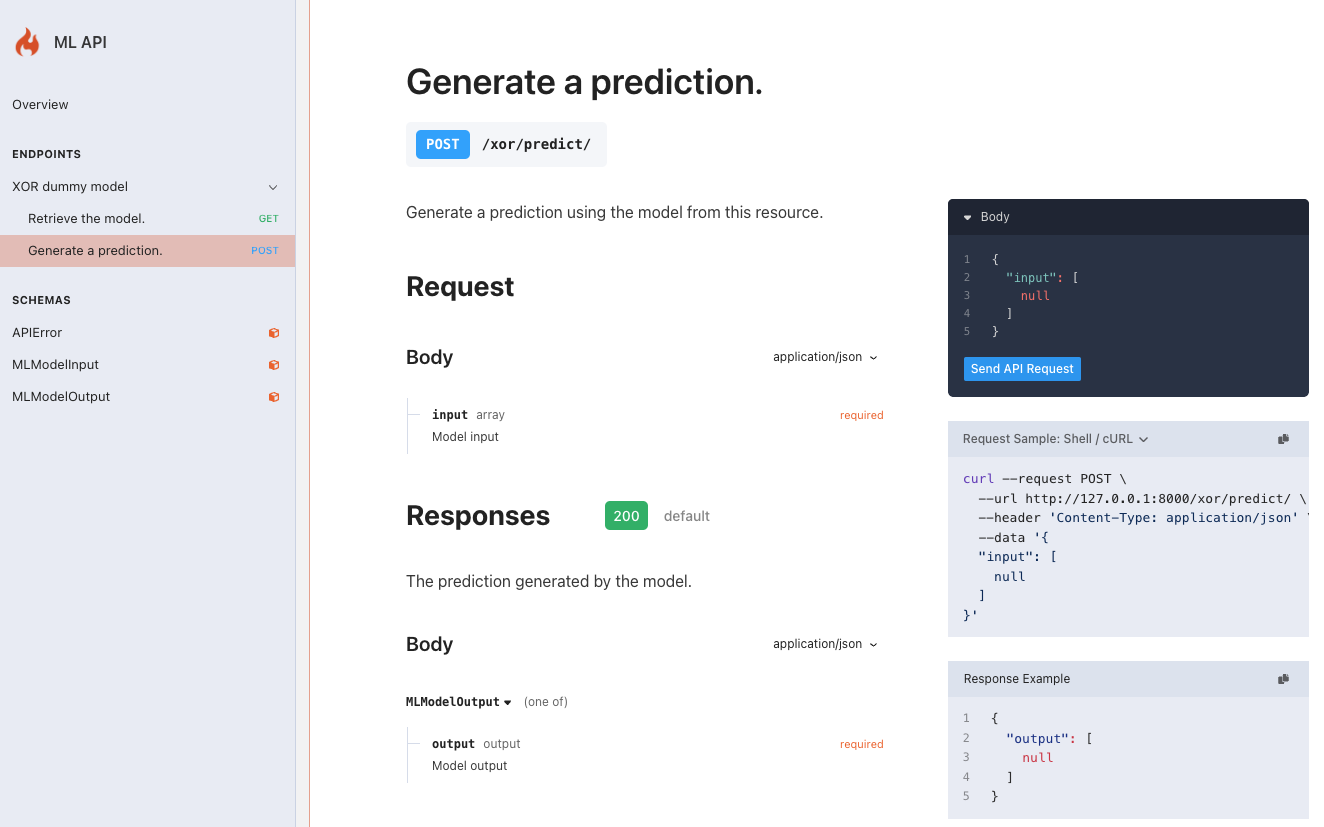
As a quick usage example which populates all application and models parameters, we can run the following command line:
> flama serve sklearn_model.flm \ --model-url="/xor" \ --model-name="XOR dummy model" \ --app-debug \ --app-title="ML API" \ --app-version="1.0.0" \ --app-description="XOR model serving for predictions" \ --app-docs="/docs/" \ --app-schema="/schema/"With these changes, the documentation at http://127.0.0.1:8000/docs/ will look like:
