Add models to your App
In this section we are going to introduce a new way of using FLM files, which will be useful for those who are interested in developing their own Flama App. There are several reasons why you can consider developing your own app, e.g. amongst other reasons you might want:
- To add further functionality which is not built-in when using the Flama CLI
- To gain control on fine details for technical reasons
- To learn by doing
This is perfectly okay, and normal. Flama CLI is not a "one size fits all" answer. Indeed, there are some characteristics of a Flama App which we may need to customise, for which we need to develop the application ourselves, e.g. startup or shutdown events, to name some examples.
Base application
For the sake of consistency across our examples, we are going to consider the following base application:
from flama import Flama, routing
class AppStatus:    loaded = False

def home():    """    tags:        - Home    summary:        Returns readiness message    description:        The function returns a readiness message in which the global variable AppStatus.loaded is shown.        If the 'startup' function has worked as expected, the message will show the 'loaded' variable as True.        Else, it'll show the variable as 'False'    """    return f"The API is ready. Loaded = {AppStatus.loaded}"

def user_me():    """    tags:        - User    summary:        Returns hello 'John Doe'    description:        The function returns the plain-text message "Hello John Doe"    """    username = "John Doe"    return f"Hello {username}"

def user(username: str):    """    tags:        - User    summary:        Returns hello 'username'    description:        The function returns the plain-text message "Hello 'username'" where the 'username' is the user specified as        query parameter.    """    return f"Hello {username}"

app = Flama(    openapi={        "info": {            "title": "Flama ML",            "version": "0.1.0",            "description": "Machine learning API using Flama 🔥",        }    },    routes=[        routing.Route("/", home),        routing.Route("/user/me", user_me),        routing.Route("/user/{username}", user),    ],)
As can be seen, we have used a non-standard configuration of the application by using the parameters:
- routes: A list of routes to serve incoming HTTP and WebSocket requests. In this particular case,
- events: A dictionary of events to run on application startup and shutdown. The dictionary has two keys:
- startup: A list of callables to run on application startup. Startup handler callables do not take any arguments, and may be either standard functions, or async functions.
- shutdown: A list of callables to run on application shutdown. Shutdown handler callables do not take any arguments, and may be either standard functions, or async functions.
We suggest to save the previous example in a local file, say examples/add_models.py, and run it with the CLI:
flama run examples.base_application:app
INFO:     Will watch for changes in these directories: ['/{YOUR_WORKING_DIRECTORY}/']INFO:     Uvicorn running on http://127.0.0.1:8000 (Press CTRL+C to quit)INFO:     Started reloader process [35011] using WatchFilesINFO:     Started server process [35034]INFO:     Waiting for application startup.INFO:     Application startup complete.
Adding events
Let us now add the startup and shutdown events to the application. We can do this by adding the following functions to the application, and then adding them to the events dictionary to the Flama constructor:
async def startup():    print("\nStarting up the ML API...\n")    # Here, whatever action we want to be run at the startup of the application    AppStatus.loaded = True

async def shutdown():    print("\nShutting down the ML API...\n")    # Here, whatever action we want to be run at the shutdown of the application
app = Flama(    openapi={        "info": {            "title": "Flama ML",            "version": "0.1.0",            "description": "Machine learning API using Flama 🔥",        }    },    routes=[        routing.Route("/", home),        routing.Route("/user/me", user_me),        routing.Route("/user/{username}", user),    ],    events={"startup": [startup], "shutdown": [shutdown]},)
If we run the application again, we should get the following output:
flama run examples.base_application:app
INFO:     Will watch for changes in these directories: ['/{YOUR_WORKING_DIRECTORY}/']INFO:     Uvicorn running on http://127.0.0.1:8000 (Press CTRL+C to quit)INFO:     Started reloader process [35011] using WatchFilesINFO:     Started server process [35034]INFO:     Waiting for application startup.
Starting up the ML API...
INFO:     Application startup complete.
If we click on the URL given above (i.e., http://127.0.0.1:8000), we should get the following message in our browser:
"The API is ready. Loaded = True"Events decorators
There is an alternative way of adding the events to the application, which is to use the on_event decorator. The following example shows how to achieve the same result as the previous one:
from flama import Flama, routing

app = Flama(    openapi={        "info": {            "title": "Flama ML",            "version": "0.1.0",            "description": "Machine learning API using Flama 🔥",        }    },    routes=[        routing.Route("/", home),        routing.Route("/user/me", user_me),        routing.Route("/user/{username}", user),    ],)

@app.on_event("startup")async def startup():    print("\nStarting up the ML API...\n")    # Here, whatever action we want to be run at the startup of the application    AppStatus.loaded = True

@app.on_event("shutdown")async def shutdown():    print("\nShutting down the ML API...\n")    # Here, whatever action we want to be run at the shutdown of the application
This is just a quick example to show the effect of startup and shutdown events. They are very convenient when we need the application to have some initialisation or deactivation steps which are specific of our particular situation.
Add models
Following the steps described in the previous section, it should be straightforward to produce ML models packaged in FLM format. What we want now is to expose such models as Resources of a Flama App. This is what constitutes what we refer to as a Flama ML API.
We already have the base Flama App up and running in development mode. Let's start adding ML models to it in live. This will be a good example to see by ourselves the advantages of running the app in development mode.
Any Flama App will have accessible the attribute models, which will have the method add_model at our disposal. The standard usage of this method will be as follows:
app.models.add_model( path="path/to/model", model="path/to/your_model_file.flm", name="model_name",)Let's examine what we need:
- app: The Flama App we are developing, and under which we want to serve ML models
- path: The URL path to find the model resource
- model: The local file path where the FLM file is at
- name: A custom name for the ML model resource for documenting purposes
Having a good understanding of what's needed, we can now proceed with some examples.
Examples
As has been the case throughout this documentation so far, we will be using the example FLM files generated in the previous section, namely:
Scikit-Learn
To proceed, we will need to add the following lines to the base application which is running (i.e., to the file examples/add_models.py):
app.models.add_model( path="/sklearn/", model="examples/sklearn_model.flm", name="sklean-model",)Right after adding and saving the document, we should see the reloading of the application happening on our terminal, something like:
...WARNING:  WatchFiles detected changes in 'examples/add_models.py'. Reloading...INFO:     Started server process [48286]INFO:     Waiting for application startup.
Starting up the ML API...
INFO:     Application startup complete.
As we already anticipated when we introduced the serve command, the model added will automatically have associated the following endpoints:
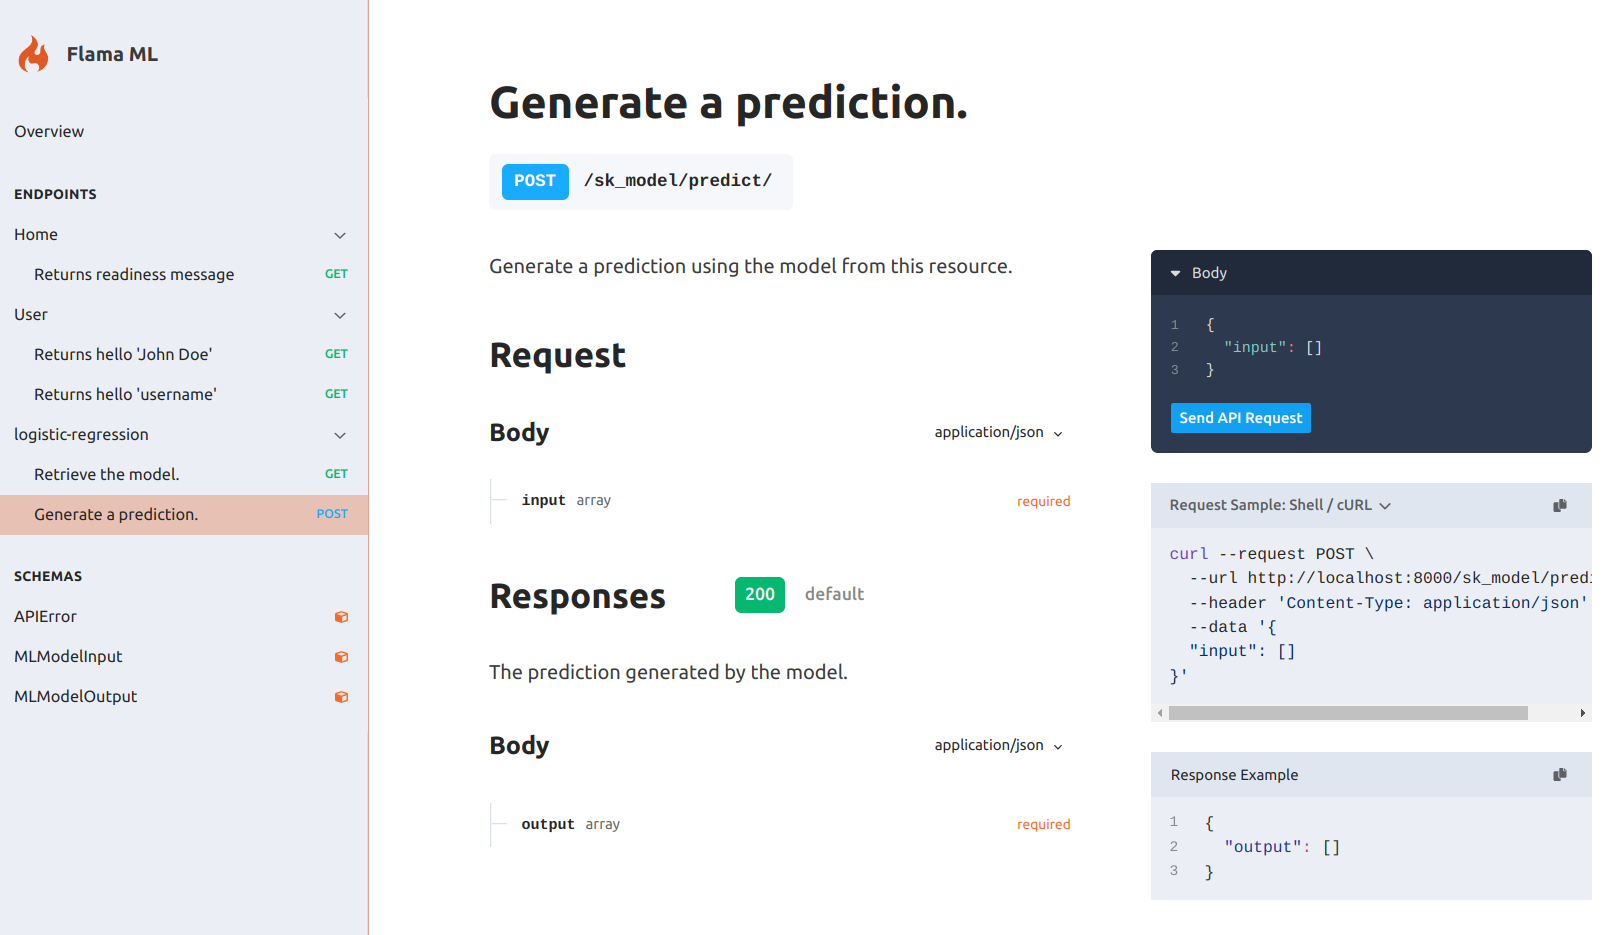
- GET /sklearn/ Returns the model resource, i.e. the model hyper-parameter's schema which would be obtained with the method get_params().
- POST /sklearn/predict/ Expects the input data (observations) to be passed as argument to predict their output.
Check the documentation at http://127.0.0.1:8000/docs/, you should see something like:
TensorFlow
As we probably are guessing, we can add TensorFlow models by adding the following lines to the base application:
app.models.add_model( path="/tensorflow/", model="examples/tensorflow_model.flm", name="tensorflow-model",)Right after adding and saving the document, we should see the reloading of the application happening on our terminal, something like:
...WARNING: WatchFiles detected changes in 'examples/add_models.py'. Reloading...INFO: Started server process [48286]INFO: Waiting for application startup.
Starting up the ML API...
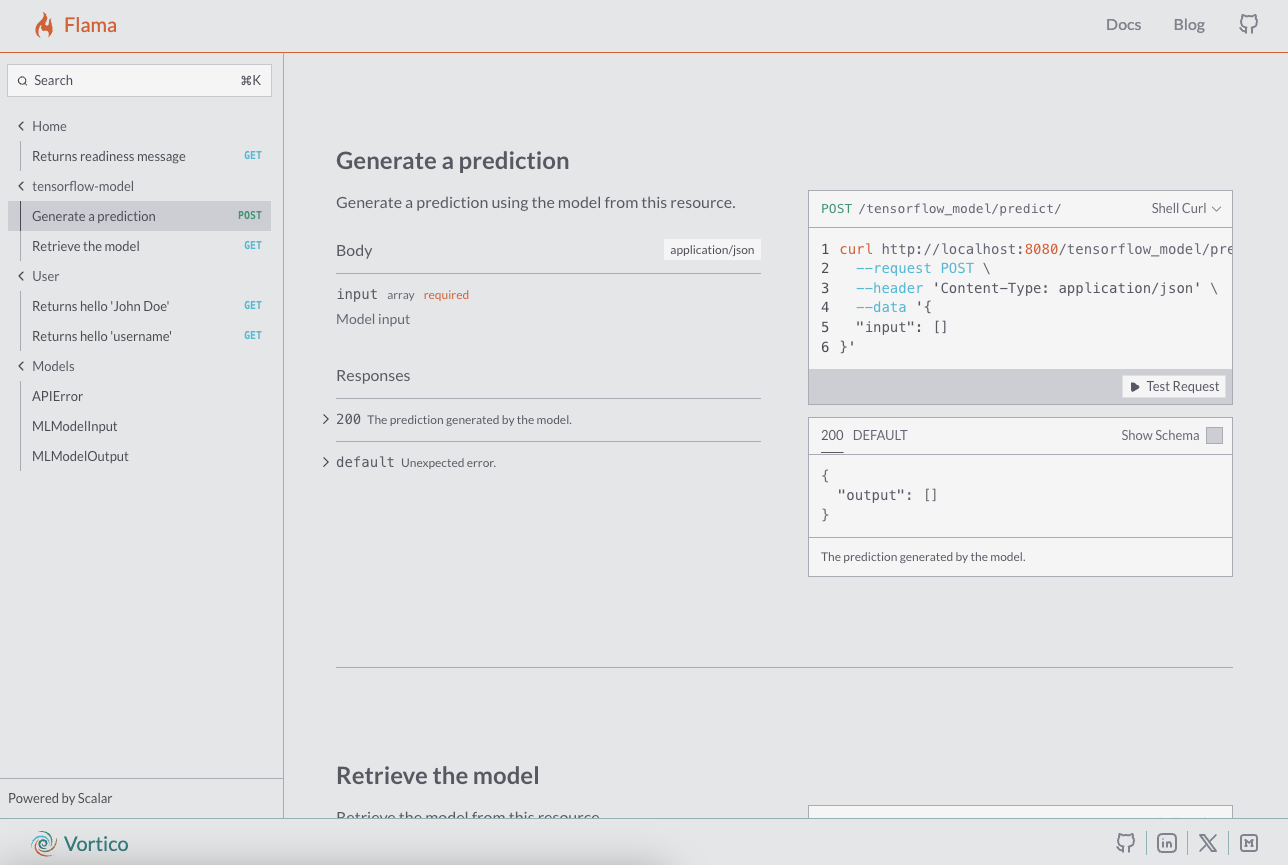
INFO: Application startup complete.Just like it happened with the scikit-learn model, our tensorflow models will automatically have associated the following endpoints:
- GET /tensorflow/ Returns the model resource, i.e. the model hyper-parameter's schema which would be obtained with the method to_json().
- POST /tensorflow/predict/ Expects the input data (observations) to be passed as argument to predict their output.
Check the documentation at http://127.0.0.1:8000/docs/, you should see something like:
PyTorch
As we can expect, there is no difference in adding PyTorch models to the already running application:
app.models.add_model( path="/pytorch/", model="examples/pytorch_model.flm", name="pytorch-model",)Right after adding and saving the document, we should see the reloading of the application happening on our terminal, something like:
...WARNING: WatchFiles detected changes in 'examples/add_models.py'. Reloading...INFO: Started server process [48286]INFO: Waiting for application startup.
Starting up the ML API...
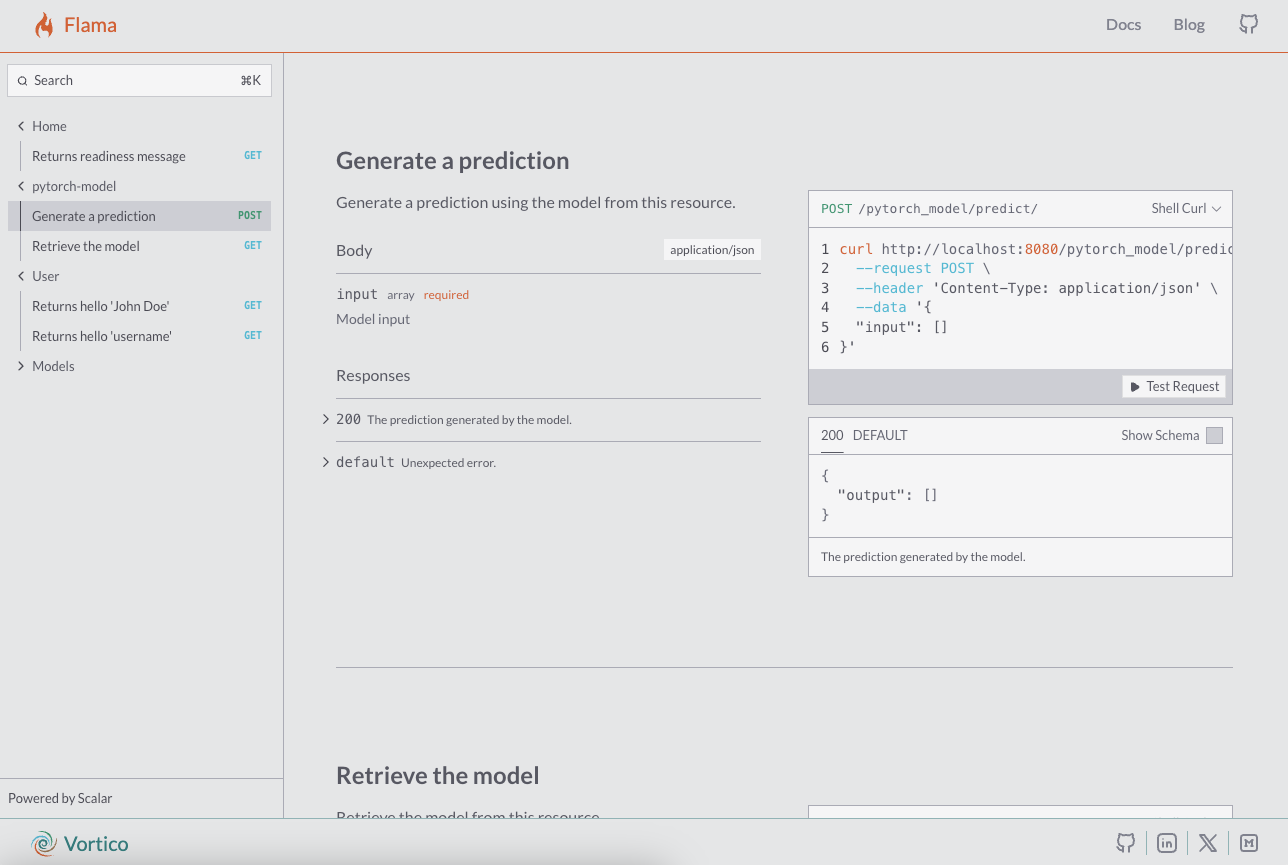
INFO: Application startup complete.Just like it happened with the scikit-learn model, and with the TensorFlow model, our PyTorch models will automatically have associated the following endpoints:
-
GET /pytorch/ Returns the model resource, i.e. the model hyper-parameter's schema which would be obtained with the following code:
{ "modules": [str(x) for x in self.model.modules()], "parameters": {k: str(v) for k, v in self.model.named_parameters()}, "state": self.model.state_dict(),} -
POST /pytorch/predict/ Expects the input data (observations) to be passed as argument to predict their output.
Check the documentation at http://127.0.0.1:8000/docs/, you should see something like:
Multiple models
A great advantage of the models module is that it can store as many models as we need. Thus, if we want to serve the three models of our prior examples at once, we only need to put together the three examples of add_model, as follows:
from flama import Flama, routing

class AppStatus:    loaded = False

async def startup():    print("\nStarting up the ML API...\n")    # Here, whatever action we want to be run at the startup of the application    AppStatus.loaded = True

async def shutdown():    print("\nShutting down the ML API...\n")    # Here, whatever action we want to be run at the shutdown of the application

def home():    """    tags:        - Home    summary:        Returns readiness message    description:        The function returns a readiness message in which the global variable AppStatus.loaded is shown.        If the 'startup' function has worked as expected, the message will show the 'loaded' variable as True.        Else, it'll show the variable as 'False'    """    return f"The API is ready. Loaded = {AppStatus.loaded}"

def user_me():    """    tags:        - User    summary:        Returns hello 'John Doe'    description:        The function returns the plain-text message "Hello John Doe"    """    username = "John Doe"    return f"Hello {username}"

def user(username: str):    """    tags:        - User    summary:        Returns hello 'username'    description:        The function returns the plain-text message "Hello 'username'" where the 'username' is the user specified as        query parameter.    """    return f"Hello {username}"

app = Flama(    openapi={        "info": {            "title": "Flama ML",            "version": "0.1.0",            "description": "Machine learning API using Flama 🔥",        }    },    routes=[        routing.Route("/", home),        routing.Route("/user/me", user_me),        routing.Route("/user/{username}", user),    ],    events={"startup": [startup], "shutdown": [shutdown]},)

app.models.add_model(    path="/sklearn/",    model="examples/sklearn_model.flm",    name="logistic-regression",)

app.models.add_model(    path="/tensorflow/",    model="examples/tensorflow_model.flm",    name="tensorflow-neural-network",)

app.models.add_model(    path="/pytorch/",    model="examples/pytorch_model.flm",    name="pytorch-model",)
If we run this example, our Flama app will have the following endpoints:
- GET /: Returns a readiness message in which the global variable AppStatus.loaded is shown. If the 'startup' function has worked as expected, the message will show the 'loaded' variable as True. Else, it'll show the variable as 'False'
- GET /user/me/: Returns the plain-text message "Hello John Doe"
- GET /user/{username}/: Returns the plain-text message "Hello 'username'" where the 'username' is the user specified as query parameter
- GET /sklearn/: Returns the representation of the model resource, i.e. a JSON with all the hyper-parameters of the model
- POST /sklearn/predict/: Returns a ScikitLearn model prediction when provided with an input data array
- GET /tensorflow/: Returns the representation of the model resource, i.e. a JSON with all the hyper-parameters of the model
- POST /tensorflow/predict/: Returns a TensorFlow model prediction when provided with an input data array
- GET /pytorch/: Returns the representation of the model resource, i.e. a JSON with all the hyper-parameters of the model
- POST /pytorch/predict/: Returns a PyTorch model prediction when provided with an input data array