Model resources
Thus far we have shown how to package models in order to add them to a Flama App. The way in which ML models are added or what they represent internally was not discussed in detail before, as that was not necessary for the purpose of previous sections. However, it should be no surprise for us, something happens under the hood when we add models. And, that "something" is responsible for making the model object(s) accessible via HTTP request to certain URL(s). When we serve/add models either by CLI serve/start or by using the syntax app.models.add_model we get the ability of interacting with the model via the URL which is specified as parameter path. Here, interacting means:
-
Obtaining a JSON representation of the model added, which contains all the parameters uniquely defining the model. We obtain this JSON representation by simply running a GET request to the model URL, e.g. http://127.0.0.1/sklearn/ for one of our examples.
-
Obtaining predictions from the model added, which requires us to send the input data on which predictions will be run. We get such predictions via a POST requests with a data payload to the method predict of the model which is represented via the model-predict URL, e.g. http://127.0.0.1/sklearn/predict/ for the same example.
This means, when we serve/add models, Flama takes care of creating a Resource object per model automatically, specifically a ModelResource object, which represents an API resource in the REST sense of the word. This object defines the default way of interaction with the model itself by providing the methods just mentioned. A more thorough discussion about the Resource class and its children classes can be found in here. However, the convenience of the method add_models might not be sufficient for your purposes for the following reasons:
- You need to customise the default methods
- You need to define new methods for the resource
In what follows you will learn how to add model resources in a more customised way with the class ModelResource.
The ModelResource class
The best way to learn how to implement your own model resources is by example, as we've been doing so far with previous concepts. For this reason, we are going to re-implement the endpoints /predict/ and /inspect/ (which come by default when using the tools seen before to serve/add models automatically) as a good starting point to showcase the steps and ingredients required. With these two examples you will develop a better understanding of the magic which happens under the hood when using either the CLI serve/start, or the method app.models.add_model. After these examples, you'll know how to implement a custom method to be served as an endpoint, together with the built-ins provided by default for this purpose.
Preamble
The first step (let's call it preamble) is to prepare our Flama app, and all the ingredients needed to be able to add custom model resources. This is exactly what you have here:
# Standard import:import flamafrom flama import Flama
# New imports (not seen so far):from flama.models import ModelResourcefrom flama.resources.routing import ResourceRoute
# Flama app instantiation:app = Flama(    title="Flama ML",    version="0.1.0",    description="Machine learning API using Flama 🔥",)
# Model resources will be added here# ( ... code ... )
# In case we want to make it a runnable script:if __name__ == "__main__":    flama.run(flama_app="__main__:app", server_host="0.0.0.0", server_port=8080, server_reload=True)
As can be seen, there are two ingredients imported which we haven't seen yet, namely:
-
ModelResource: This is a Flama built-in class which derives from the most fundamental resource class Resource, and the metaclass ModelResourceType. These classes can be seen as the interface that any custom model class will need to adhere to. In case you're not familiar with the interface design pattern, we like the definition given by RealPython:
At a high level, an interface acts as a blueprint for designing classes. Like classes, interfaces define methods. Unlike classes, these methods are abstract. An abstract method is one that the interface simply defines. It doesn’t implement the methods. This is done by classes, which then implement the interface and give concrete meaning to the interface’s abstract methods.
Regarding ModelResourceType, this is a Flama built-in metaclass which derives from the most fundamental resource type metaclass ResourceType. The concept of metaclass is a bit less intuitive, and some highly recognised pythonists recommend to avoid them:
Metaclasses are deeper magic than 99% of users should ever worry about. If you wonder whether you need them, you don’t (the people who actually need them know with certainty that they need them, and don’t need an explanation about why).
- Tim Peters
We agree with such a claim, which is why you won't need to worry about them because you won't even have to import ModelResourceType, since this is already handled for you by the ModelResource class.
-
ResourceRoute.method: This is a Flama built-in class method (of
ResourceRoute) which allows us to convert a given class method into an app endpoint, with the following main arguments:- path: Route path through which we'll be able to call the decorated method, e.g. /predict/
- methods: HTTP methods associated with the endpoint, e.g. GET or POST
- name: Name which uniquely determines the route being added to the app.
Predict
We can start with one of the endpoints given for granted when using the tools showed in previous sections, namely /predict/. The way in which we build our own model resource is very straightforward, we only need to use the following pattern:
# FIXME: Missing schemas
class MySKModel(ModelResource):    # special names:    verbose_name = "My ScikitLearn Model"    model_path = "sklearn_model.flm"    name = "sk_model"
    # FIXME: Missing types    #       This won't work, but it's almost correct    @ResourceRoute.method("/predict", methods=["POST"], name="model-predict")    def predict(self, data):        return self.model.predict(data)
As we already said, this example is not functional (just yet). However, it contains a good amount of the pieces required, so we can start talking about these ingredients:
-
MySKModel(ModelResource): The very first thing needed is to create our own model-resource class, which means inheriting from ModelResource. Just with this, your model-resource class will be Flama compliant.
-
Special attribute names: These three attributes are mandatory for several purposes. The attribute model_path specifies where to find the binary file with the model, verbose_name defines a tag for the documentation, and name is used only internally, but required to uniquely identify the resource being added.
-
@ResourceRoute.method: The first argument determines the path associated to the method which the decorator accompanies to, e.g. /predict/. It also receives as parameter methods, which refers to the request methods to which this endpoint responds to (e.g. POST), and name, a parameter used internally to uniquely identify this endpoint.
It's time to know why we said the previous example won't work: it's all due to missing types and schemas.
Flama is a strongly-typed-and-schema-specific framework. Wait, what? This only means that we need to provide the schema type of the input and output arguments if we want any method to be Flama compliant, and such schemas need to be registered in the app.
What do we need to make this example a working example? Let's see what the correct code looks like:
import typesystem as ts
# Definition of input (X) and ouput (Y) schemasX = ts.Schema(fields={"input": ts.fields.Array()})Y = ts.Schema(fields={"output": ts.fields.Array()})
# Registration of schemas:app.schema.register_schema("X", X)app.schema.register_schema("Y", Y)
class MySKModel(ModelResource):    # special names:    verbose_name = "My ScikitLearn Model"    model_path = "sklearn_model.flm"    name = "sk_model"
    # Correct typed method with some documentation    @ResourceRoute.method("/predict/", methods=["POST"], name="model-predict")    def predict(self, data: X) -> Y:        """        tags:            - My ScikitLearn Model        summary:            Run predict method.        description:            This is a more detailed description of the predict method.        responses:            200:                description: ML model prediction.        """        return {"output": self.model.predict(data["input"])}
You will notice the following changes:
-
typesystem.Schemas: We've added two schemas to define the data type of the input and the output. We have used typesystem for this purpose. If you don't remember how this python package got there, go back to Quickstart. Also, remember that Flama is also compatible with Marshmallow. For more information about how to define schemas, we refer to their official documentation websites: typesystem, and marshmallow, respectively.
-
app.schema.register_schema: These lines appear right after the definition of our schemas, and they are intended to register the new data schemas in the app. This makes possible the automatic identification of body arguments in request, via the design pattern known as dependency injection. The finer details on how this happens are left aside (we recommend the curious developer to dive into the code, taking advantage of the open code). In layman's terms, thanks to the registration of these schemas, Flama will be in charge of identifying what's what when a request comes accompanied by data by analysing the schema of the input data.
-
predict(self, data: X) -> Y: Type hinting is mandatory, and (as we just mentioned) plays a key role in the dependency injection responsible for identifying and type-checking incoming data.
Finally, we can put all these pieces together and get a fully functional code. Thus, you should now be able to flama-run it (this is how we read the `flama run command line) after adding the previous code snippet to the code introduced in the preamble. Or, if you prefer, you can get the full example from here.
Inspect
It shouldn't be a surprise that the other endpoint we got for free before, i.e. GET /, is completely analogous to the previous example. In the following code, we introduce a reimplementation of such method under a different route in order to be able to compare both:
class MyModel(ModelResource):    name = "my_model"    verbose_name = "My ML model"    model_path = "path/to/your_model_file.flm"
    @ResourceRoute.method("/inspect/", methods=["GET"], name="model-inspect-model")    def inspect_model(self):        """        tags:            - My ScikitLearn Model        summary:            Get metadata info.        description:            This is a more detailed description of the method.        responses:            200:                description: ML model info.        """        return {"params": self.model.inspect()}
Custom methods
And, finally, let's add something completely custom to our model-resource. We will add a method to get information about the model itself, which is not part of the model's API. This is a good example of how to add custom methods to your model-resource. In particular, the method will return metadata information about the model, such as the name of the model, the version of the library used to train it, and the version of the model itself. The code is as follows:
class MyModel(ModelResource): name = "my_model" verbose_name = "My ML model" model_path = "path/to/your_model_file.flm"
# custom attributes info = { "model_version": "1.0.0", "library_version": "1.0.2", }
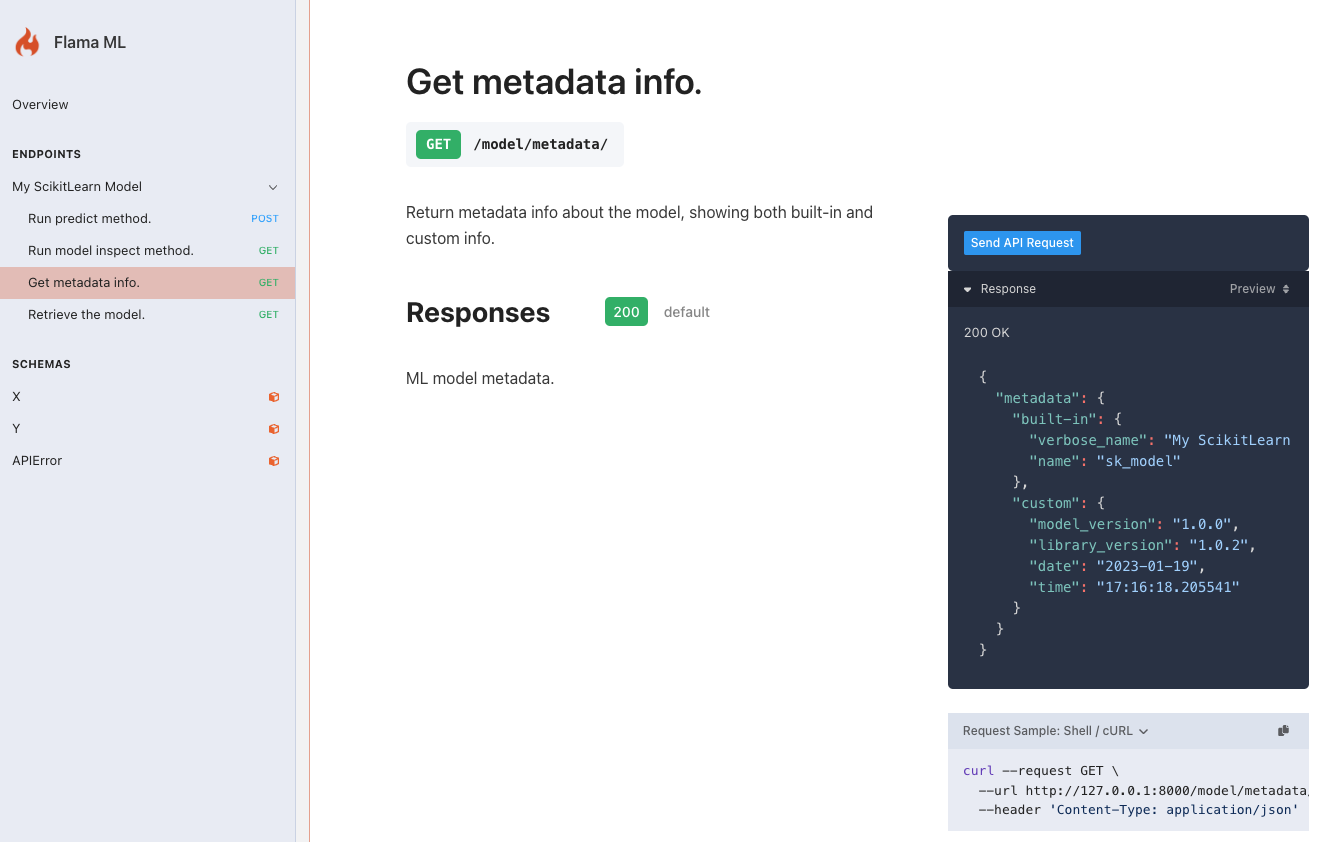
@ResourceRoute.method("/metadata/", methods=["GET"], name="metadata-method") def metadata(self): """ tags: - My ScikitLearn Model summary: Get metadata info. description: This is a more detailed description of the method. responses: 200: description: ML model metadata. """
return {"metadata": { "built-in": {"verbose_name": self._meta.verbose_name, "name": self._meta.name}, "custom": {**self.info, "date": datetime.now().date(), "time": datetime.now().time()}, }}Adding the resource
Despite that we have said that the previous code is enough to make our model-resource work, we still need to add it to the app. This can be done in two ways: explicitly or implicitly. The first one might seem more straightforward, and it is indeed, but it is also more verbose. The second one is more concise, and only requires the use of a decorator on top of the model-resource class definition. Let's see both ways:
Explicit
class MyModel(ModelResource):    ...
app.models.add_model_resource(path="/my_model", resource=MyModel)
Decorator
@app.models.model_resource("/model")class MyModel(ModelResource): ...With this, we have finished the implementation of our model resource. Now, we can run the app and test it. We can do so
by either running the app directly from our editor, or by using the flama run command line.
In the latter case, we can use the --app-debug flag to enable the debugging mode, which will allow us to use the interactive
debugger in case of an error. The following code shows how to run the app using the flama run command line:
flama run add_model_resource:app --app-debugExamples
So far, we have seen all the necessary steps to add a custom model resource to our app. In particular a ScikitLearn model-resource. However, we have not shown how to implement a PyTorch or TensorFlow resource. Actually, the steps are exactly the same for all.
In the following, we show the template code related to the implementation of a custom model resource for the different libraries mentioned above. As customary already, we will be using the example FLM files generated in the previous section, namely:
PyTorch
@app.models.model_resource("/pytorch_model/")class PyTorchModel(ModelResource):    name = "pythorch_model"    verbose_name = "PyTorch model"    model_path = "pytorch_model.flm"
    info = {        "model_version": "1.0.0",        "library_version": "1.0.2",    }
    @ResourceRoute.method("/metadata/", methods=["GET"], name="pytorch-metadata")    def metadata(self):        """        tags:            - PyTorch model        summary:            Get metadata info.        description:            Method returning relevant metadata information.        responses:            200:                description: ML model metadata.        """
        return {"metadata": {            "built-in": {"verbose_name": self._meta.verbose_name, "name": self._meta.name},            "custom": {**self.info, "date": datetime.now().date(), "time": datetime.now().time()},        }}
Scikit-Learn
@app.models.model_resource("/sklearn_model/")class SKLearnModel(ModelResource):    name = "pythorch_model"    verbose_name = "ScikitLearn model"    model_path = "sklearn_model.flm"
    info = {        "model_version": "1.0.0",        "library_version": "1.0.2",    }
    @ResourceRoute.method("/metadata/", methods=["GET"], name="sklearn-metadata")    def metadata(self):        """        tags:            - ScikitLearn model        summary:            Get metadata info.        description:            Method returning relevant metadata information.        responses:            200:                description: ML model metadata.        """
        return {"metadata": {            "built-in": {"verbose_name": self._meta.verbose_name, "name": self._meta.name},            "custom": {**self.info, "date": datetime.now().date(), "time": datetime.now().time()},        }}
TensorFlow
@app.models.model_resource("/tensorflow_model/")class SKLearnModel(ModelResource):    name = "tensorflow_model"    verbose_name = "TensorFlow model"    model_path = "tensorflow_model.flm"
    info = {        "model_version": "1.0.0",        "library_version": "1.0.2",    }
    @ResourceRoute.method("/metadata/", methods=["GET"], name="tensorflow-metadata")    def metadata(self):        """        tags:            - TensorFlow model        summary:            Get metadata info.        description:            Method returning relevant metadata information.        responses:            200:                description: ML model metadata.        """
        return {"metadata": {            "built-in": {"verbose_name": self._meta.verbose_name, "name": self._meta.name},            "custom": {**self.info, "date": datetime.now().date(), "time": datetime.now().time()},        }}
Once you have your custom model resource implemented, you can run the app and test it. The best way to check that everything is working as expected is by navigating to the /docs/ endpoint. This will show you the documentation of the app, as well as the documentation of the custom model resource. In the following, we show the documentation of the custom model resource for the ScikitLearn model: